JAX 型別提升語意設計#
![]()

Jake VanderPlas,2021 年 12 月
任何數值計算函式庫在設計時面臨的挑戰之一,是如何處理不同型別值之間的運算。本文檔概述了 JAX 使用的提升語意背後的思考過程,總結於JAX 型別提升語意。
JAX 型別提升的目標#
JAX 的數值計算 API 以 NumPy 為模型,並進行了一些增強,包括能夠鎖定 GPU 和 TPU 等加速器。這使得採用 NumPy 的型別提升系統對 JAX 使用者來說是不利的:NumPy 的型別提升規則嚴重偏好 64 位元輸出,這對於加速器上的計算來說是有問題的。GPU 和 TPU 等裝置通常在使用 64 位元浮點型別時會付出顯著的效能代價,並且在某些情況下根本不支援原生 64 位元浮點型別。
這種有問題的型別提升語意的一個簡單範例,可以在 32 位元整數和浮點數之間的二元運算中看到
import numpy as np
np.dtype(np.int32(1) + np.float32(1))
dtype('float64')
NumPy 傾向於產生 64 位元值是一個長期存在的問題,在使用 NumPy 的 API 進行加速器計算時,目前還沒有好的解決方案。因此,JAX 試圖以加速器為中心重新思考 NumPy 風格的型別提升。
回顧:表格與格#
在深入細節之前,我們先退一步思考如何思考型別提升的問題。考慮 Python 內建數值型別(即 int、float 和 complex 型別)之間的算術運算。透過幾行程式碼,我們可以產生 Python 用於這些型別值之間加法的型別提升表
import pandas as pd
types = [int, float, complex]
name = lambda t: t.__name__
pd.DataFrame([[name(type(t1(1) + t2(1))) for t1 in types] for t2 in types],
             index=[name(t) for t in types], columns=[name(t) for t in types])
| int | float | complex | |
|---|---|---|---|
| int | int | float | complex |
| float | float | float | complex |
| complex | complex | complex | complex |
此表列舉了 Python 的數值型別提升行為,但事實證明,有一種互補的表示法更簡潔:格表示法,其中任何兩個節點之間的上確界是它們提升到的型別。Python 提升表的格表示法要簡單得多
顯示程式碼儲存格來源
#@title
import networkx as nx
import matplotlib.pyplot as plt
lattice = {'int': ['float'], 'float': ['complex']}
graph = nx.from_dict_of_lists(lattice, create_using=nx.DiGraph)
pos = {'int': [0, 0], 'float': [1, 0], 'complex': [2, 0]}
fig, ax = plt.subplots(figsize=(8, 2))
nx.draw(graph, with_labels=True, node_size=4000, node_color='lightgray', pos=pos, ax=ax, arrowsize=20)
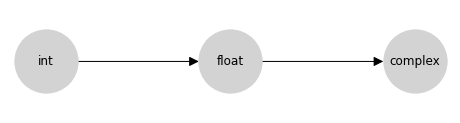
此格是上面提升表中資訊的簡潔編碼。您可以透過追蹤圖形到兩個節點的第一個共同子節點(包括節點本身)來找到兩個輸入的型別提升結果;在數學上,這個共同子節點稱為格上該對的上確界,或最小上界,或聯結;在這裡我們將把這個操作稱為聯結。
從概念上講,箭頭表示允許在來源和目的地之間進行隱式型別提升:例如,允許從整數到浮點數的隱式提升,但不允許從浮點數到整數的隱式提升。
請記住,一般而言,並非每個有向無環圖 (DAG) 都滿足格的屬性。格要求每對節點都存在唯一的最小上界;因此,例如,以下兩個 DAG 不是格
顯示程式碼儲存格來源
#@title
import networkx as nx
import matplotlib.pyplot as plt

fig, ax = plt.subplots(1, 2, figsize=(10, 2))

lattice = {'A': ['B', 'C']}
graph = nx.from_dict_of_lists(lattice, create_using=nx.DiGraph)
pos = {'A': [0, 0], 'B': [1, 0.5], 'C': [1, -0.5]}
nx.draw(graph, with_labels=True, node_size=2000, node_color='lightgray', pos=pos, ax=ax[0], arrowsize=20)
ax[0].set(xlim=[-0.5, 1.5], ylim=[-1, 1])

lattice = {'A': ['C', 'D'], 'B': ['C', 'D']}
graph = nx.from_dict_of_lists(lattice, create_using=nx.DiGraph)
pos = {'A': [0, 0.5], 'B': [0, -0.5], 'C': [1, 0.5], 'D': [1, -0.5]}
nx.draw(graph, with_labels=True, node_size=2000, node_color='lightgray', pos=pos, ax=ax[1], arrowsize=20)
ax[1].set(xlim=[-0.5, 1.5], ylim=[-1, 1]);
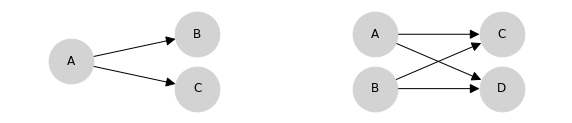
左側的 DAG 不是格,因為節點 B 和 C 不存在上界;右側的 DAG 在兩個方面都失敗了:首先,節點 C 和 D 不存在上界,對於節點 A 和 B,最小上界無法唯一確定:C 和 D 都是候選者,但它們是不可排序的。
型別提升格的屬性#
使用格來指定型別提升可確保許多有用的屬性。使用 \(\vee\) 運算子表示格上的聯結,我們有
存在性: 根據定義,格要求每對元素都存在唯一的格聯結:\(\forall (a, b): \exists !(a \vee b)\)
交換性: 格聯結是可交換的:\(\forall (a, b): a\vee b = b \vee a\)。
結合性: 格聯結是結合的:\(\forall (a, b, c): a \vee (b \vee c) = (a \vee b) \vee c\)。
另一方面,這些屬性暗示了它們可以表示的型別提升系統的限制;特別是並非每個型別提升表都可以用格表示。NumPy 的完整型別提升表就是一個現成的例子;可以透過反例快速證明這一點:以下是 NumPy 中提升行為不具結合性的三種純量型別
import numpy as np
a, b, c = np.int8(1), np.uint8(1), np.float16(1)
print(np.dtype((a + b) + c))
print(np.dtype(a + (b + c)))
float32
float16
這樣的結果可能會讓使用者感到驚訝:我們通常期望數學表達式映射到數學概念,因此,例如,a + b + c 應等效於 c + b + a;x * (y + z) 應等效於 x * y + x * z。如果型別提升是非結合性或非交換性的,這些屬性將不再適用。
此外,與基於表格的系統相比,基於格的型別提升系統更容易概念化和理解。例如,JAX 識別 18 種不同的型別:由 18 個節點和稀疏、有充分動機的連線組成的提升格,比包含 324 個條目的表格更容易記在腦海中。
因此,我們選擇為 JAX 使用基於格的型別提升系統。
類別內的型別提升#
數值計算函式庫通常不僅提供 int、float 和 complex;在每個類別中,都有各種可能的精度,以數值表示中使用的位元數表示。我們在這裡將考慮的類別是
無號整數,包括
uint8、uint16、uint32和uint64(我們將簡稱u8、u16、u32、u64)帶號整數,包括
int8、int16、int32和int64(我們將簡稱i8、i16、i32、i64)浮點數,包括
float16、float32和float64(我們將簡稱f16、f32、f64)複數浮點數,包括
complex64和complex128(我們將簡稱c64、c128)
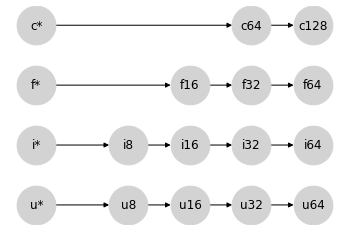
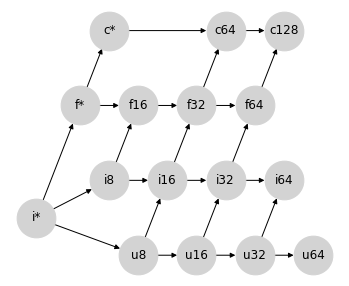
NumPy 在這四種類別內的型別提升語意相對簡單:型別的有序層次結構直接轉換為四個單獨的格,表示類別內型別提升規則
顯示程式碼儲存格來源
#@title
import networkx as nx
import matplotlib.pyplot as plt
lattice = {
  'u8': ['u16'], 'u16': ['u32'], 'u32': ['u64'],
  'i8': ['i16'], 'i16': ['i32'], 'i32': ['i64'],
  'f16': ['f32'], 'f32': ['f64'],
  'c64': ['c128']
}
graph = nx.from_dict_of_lists(lattice, create_using=nx.DiGraph)
pos = {
  'u8': [0, 0], 'u16': [1, 0], 'u32': [2, 0], 'u64': [3, 0],
  'i8': [0, 1], 'i16': [1, 1], 'i32': [2, 1], 'i64': [3, 1],
  'f16': [1, 2], 'f32': [2, 2], 'f64': [3, 2],
  'c64': [2, 3], 'c128': [3, 3],
}
fig, ax = plt.subplots(figsize=(6, 4))
nx.draw(graph, with_labels=True, node_size=1500, node_color='lightgray', pos=pos, ax=ax)
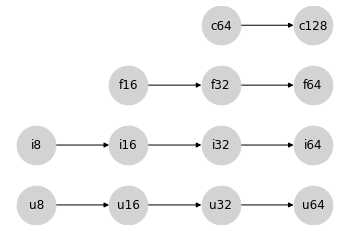
就 JAX 試圖避免的值提升到 64 位元而言,這些同種類別內的提升語意沒有問題:產生 64 位元輸出的唯一方法是具有 64 位元輸入。
進入 Python 純量#
現在讓我們思考一下 Python 純量如何融入其中。
在 NumPy 中,提升行為會根據輸入是陣列還是純量而有所不同。例如,當對兩個純量進行運算時,適用正常的提升規則
x = np.int8(0)  # int8 scalar
y = 1  # Python int = int64 scalar
(x + y).dtype
dtype('int64')
在這裡,Python 值 1 被視為 int64,並且直接的類別內規則會產生 int64 結果。
但是,在 Python 純量和 NumPy 陣列之間的運算中,純量會服從陣列的 dtype。例如
x = np.zeros(1, dtype='int8')  # int8 array
y = 1  # Python int = int64 scalar
(x + y).dtype
dtype('int8')
在這裡,int64 純量的位元寬度被忽略,並服從陣列的位元寬度。
這裡還有另一個細節:當 NumPy 型別提升涉及純量時,輸出 dtype 取決於值:如果 Python 純量對於給定的 dtype 來說太大,它會被提升為相容的型別
x = np.zeros(1, dtype='int8')  # int8 array
y = 1000  # int64 scalar
(x + y).dtype
dtype('int16')
對於 JAX 的目的而言,由於 JIT 編譯和其他轉換的性質,取決於值的提升是不可行的,因為它們作用於資料的抽象表示,而沒有參考它們的值。
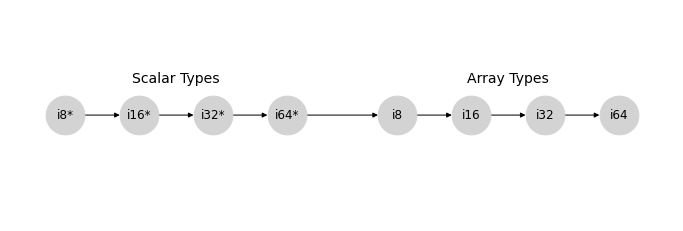
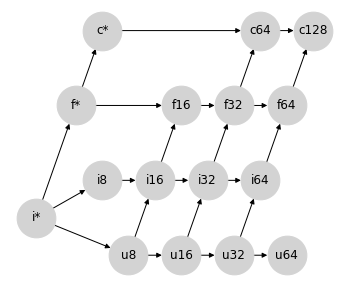
忽略取決於值的影響,NumPy 型別提升的帶號整數分支可以用以下格表示,我們將使用 * 標記純量 dtype
顯示程式碼儲存格來源
#@title
import networkx as nx
import matplotlib.pyplot as plt
lattice = {
  'i8*': ['i16*'], 'i16*': ['i32*'], 'i32*': ['i64*'], 'i64*': ['i8'],
  'i8': ['i16'], 'i16': ['i32'], 'i32': ['i64']
}
graph = nx.from_dict_of_lists(lattice, create_using=nx.DiGraph)
pos = {
  'i8*': [0, 1], 'i16*': [2, 1], 'i32*': [4, 1], 'i64*': [6, 1],
  'i8': [9, 1], 'i16': [11, 1], 'i32': [13, 1], 'i64': [15, 1],
}
fig, ax = plt.subplots(figsize=(12, 4))
nx.draw(graph, with_labels=True, node_size=1500, node_color='lightgray', pos=pos, ax=ax)
ax.text(3, 1.6, "Scalar Types", ha='center', fontsize=14)
ax.text(12, 1.6, "Array Types", ha='center', fontsize=14)
ax.set_ylim(-1, 3);
類似的模式也適用於 uint、float 和 complex 格。
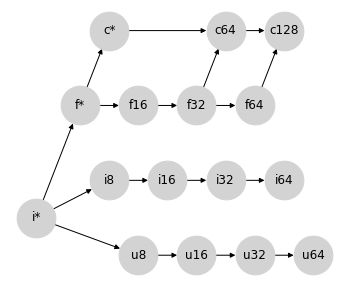
為了簡單起見,讓我們將每個類別的純量型別摺疊成一個節點,分別用 u*、i*、f* 和 c* 表示。我們的類別內格集現在可以這樣表示
顯示程式碼儲存格來源
#@title
import networkx as nx
import matplotlib.pyplot as plt
lattice = {
  'u*': ['u8'], 'u8': ['u16'], 'u16': ['u32'], 'u32': ['u64'],
  'i*': ['i8'], 'i8': ['i16'], 'i16': ['i32'], 'i32': ['i64'],
  'f*': ['f16'], 'f16': ['f32'], 'f32': ['f64'],
  'c*': ['c64'], 'c64': ['c128']
}
graph = nx.from_dict_of_lists(lattice, create_using=nx.DiGraph)
pos = {
  'u*': [0, 0], 'u8': [3, 0], 'u16': [5, 0], 'u32': [7, 0], 'u64': [9, 0],
  'i*': [0, 1], 'i8': [3, 1], 'i16': [5, 1], 'i32': [7, 1], 'i64': [9, 1],
  'f*': [0, 2], 'f16': [5, 2], 'f32': [7, 2], 'f64': [9, 2],
  'c*': [0, 3], 'c64': [7, 3], 'c128': [9, 3],
}
fig, ax = plt.subplots(figsize=(6, 4))
nx.draw(graph, with_labels=True, node_size=1500, node_color='lightgray', pos=pos, ax=ax)
在某些方面,將純量放在左側是一個奇怪的選擇:純量型別可能包含任何寬度的值,但是當與給定型別的陣列互動時,提升結果會服從陣列型別。這樣做的好處是,當您對陣列 x 執行 x + 2 之類的運算時,x 的型別將會延續到結果,無論其寬度如何
for dtype in [np.int8, np.int16, np.int32, np.int64]:
  x = np.arange(10, dtype=dtype)
  assert (x + 2).dtype == dtype
這種行為激發了我們對純量值的 * 表示法的動機:* 讓人聯想到可以採用任何所需值的萬用字元。
這些語意的好處是,您可以輕鬆地使用簡潔的 Python 程式碼表達一系列運算,而無需將純量顯式轉換為適當的型別。想像一下,如果您必須寫成這樣,而不是寫成這樣
3 * (x + 1) ** 2
您必須寫成這樣
np.int32(3) * (x + np.int32(1)) ** np.int32(2)
雖然它是顯式的,但數值程式碼將變得難以閱讀或撰寫。使用上述純量提升語意,給定一個型別為 int32 的陣列 x,第二個語句中的型別在第一個語句中是隱式的。
組合格#
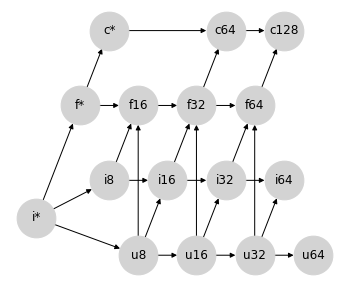
回想一下,我們一開始的討論是介紹表示 Python 中型別提升的格:int -> float -> complex。讓我們將其重寫為 i* -> f* -> c*,並進一步允許 i* 包含 u*(畢竟,Python 中沒有無號整數純量型別)。
將它們全部放在一起,我們得到以下部分格,表示 Python 純量和 numpy 陣列之間的型別提升
顯示程式碼儲存格來源
#@title
import networkx as nx
import matplotlib.pyplot as plt
lattice = {
  'i*': ['f*', 'u8', 'i8'], 'f*': ['c*', 'f16'], 'c*': ['c64'],
  'u8': ['u16'], 'u16': ['u32'], 'u32': ['u64'],
  'i8': ['i16'], 'i16': ['i32'], 'i32': ['i64'],
  'f16': ['f32'], 'f32': ['f64'],
  'c64': ['c128']
}
graph = nx.from_dict_of_lists(lattice, create_using=nx.DiGraph)
pos = {
  'i*': [-1.25, 0.5], 'f*': [-0.5, 2], 'c*': [0, 3],
  'u8': [0.5, 0], 'u16': [1.5, 0], 'u32': [2.5, 0], 'u64': [3.5, 0],
  'i8': [0, 1], 'i16': [1, 1], 'i32': [2, 1], 'i64': [3, 1],
  'f16': [0.5, 2], 'f32': [1.5, 2], 'f64': [2.5, 2],
  'c64': [2, 3], 'c128': [3, 3],
}
fig, ax = plt.subplots(figsize=(6, 5))
nx.draw(graph, with_labels=True, node_size=1500, node_color='lightgray', pos=pos, ax=ax)

請注意,這(尚未)不是真正的格:對於許多節點對,聯結不存在。但是,我們可以將其視為部分格,其中某些節點對沒有定義的提升行為,並且此部分格的已定義部分確實正確地描述了 NumPy 的陣列提升行為(撇開上面提到的取決於值的語意)。
這建立了一個很好的框架,我們可以透過在此圖形上新增連線來思考填寫這些未定義的提升規則。但是要新增哪些連線呢?廣義而言,我們希望任何額外的連線都滿足一些屬性
提升應滿足交換性和結合性屬性:換句話說,圖形應保持為(部分)格。
提升絕不應允許丟棄資料的整個組件:例如,我們絕不應將
complex提升為float,因為它會丟棄任何虛部。提升絕不應導致未處理的溢位。例如,
uint32的最大可能值是int32最大可能值的兩倍,因此我們不應隱式地將uint32提升為int32。在可能的情況下,提升應避免精度損失。例如,
int64值可能具有 64 位元尾數,因此將int64提升為float64可能會造成精度損失。但是,最大可表示的 float64 大於最大可表示的 int64,因此在這種情況下,標準 #3 仍然滿足。在可能的情況下,二元提升應避免產生比輸入更寬的型別。這是為了確保 JAX 的隱式提升對於基於加速器的工作流程仍然友好,在這些工作流程中,使用者通常希望將型別限制為 32 位元(或在某些情況下為 16 位元)值。
格上的每個新連線都會為使用者帶來一定程度的便利性(一組新的型別,可以在沒有顯式轉換的情況下互動),但是如果違反上述任何標準,便利性可能會變得太過昂貴。開發完整的提升格涉及在這便利性和成本之間取得平衡。
混合提升:浮點數和複數#
讓我們從可能是最簡單的情況開始,即浮點數和複數值之間的提升。
複數由成對的浮點數組成,因此我們在它們之間有一條自然的提升路徑:將浮點數轉換為複數,同時保持實部的寬度。就我們的部分格表示而言,它看起來像這樣
顯示程式碼儲存格來源
#@title
import networkx as nx
import matplotlib.pyplot as plt
lattice = {
  'i*': ['f*', 'u8', 'i8'], 'f*': ['c*', 'f16'], 'c*': ['c64'],
  'u8': ['u16'], 'u16': ['u32'], 'u32': ['u64'],
  'i8': ['i16'], 'i16': ['i32'], 'i32': ['i64'],
  'f16': ['f32'], 'f32': ['f64', 'c64'], 'f64': ['c128'],
  'c64': ['c128']
}
graph = nx.from_dict_of_lists(lattice, create_using=nx.DiGraph)
pos = {
  'i*': [-1.25, 0.5], 'f*': [-0.5, 2], 'c*': [0, 3],
  'u8': [0.5, 0], 'u16': [1.5, 0], 'u32': [2.5, 0], 'u64': [3.5, 0],
  'i8': [0, 1], 'i16': [1, 1], 'i32': [2, 1], 'i64': [3, 1],
  'f16': [0.5, 2], 'f32': [1.5, 2], 'f64': [2.5, 2],
  'c64': [2, 3], 'c128': [3, 3],
}
fig, ax = plt.subplots(figsize=(6, 5))
nx.draw(graph, with_labels=True, node_size=1500, node_color='lightgray', pos=pos, ax=ax)
事實證明,這完全表示了 Numpy 在混合浮點數/複數型別提升中使用的語意。
混合提升:帶號和無號整數#
對於下一個情況,讓我們考慮一些更困難的情況:帶號和無號整數之間的提升。例如,當將 uint8 提升為帶號整數時,我們需要多少位元?
乍看之下,您可能會認為將 uint8 提升為 int8 是很自然的;但是最大的 uint8 數字在 int8 中是不可表示的。因此,將無號整數提升為位元數是兩倍的整數更有意義;這種提升行為可以透過在提升格中新增以下連線來表示
顯示程式碼儲存格來源
#@title
import networkx as nx
import matplotlib.pyplot as plt
lattice = {
  'i*': ['f*', 'u8', 'i8'], 'f*': ['c*', 'f16'], 'c*': ['c64'],
  'u8': ['u16', 'i16'], 'u16': ['u32', 'i32'], 'u32': ['u64', 'i64'],
  'i8': ['i16'], 'i16': ['i32'], 'i32': ['i64'],
  'f16': ['f32'], 'f32': ['f64', 'c64'], 'f64': ['c128'],
  'c64': ['c128']
}
graph = nx.from_dict_of_lists(lattice, create_using=nx.DiGraph)
pos = {
  'i*': [-1.25, 0.5], 'f*': [-0.5, 2], 'c*': [0, 3],
  'u8': [0.5, 0], 'u16': [1.5, 0], 'u32': [2.5, 0], 'u64': [3.5, 0],
  'i8': [0, 1], 'i16': [1, 1], 'i32': [2, 1], 'i64': [3, 1],
  'f16': [0.5, 2], 'f32': [1.5, 2], 'f64': [2.5, 2],
  'c64': [2, 3], 'c128': [3, 3],
}
fig, ax = plt.subplots(figsize=(6, 5))
nx.draw(graph, with_labels=True, node_size=1500, node_color='lightgray', pos=pos, ax=ax)
同樣,這裡新增的連線正是 Numpy 為混合整數提升實作的提升語意。
如何處理 uint64?#
混合帶號/無號整數提升的方法遺漏了一種類型:uint64。依照上面的模式,涉及 uint64 的混合整數運算的輸出應產生 int128,但這不是標準可用的 dtype。
Numpy 在這裡的選擇是提升為 float64
(np.uint64(1) + np.int64(1)).dtype
dtype('float64')
但是,這可能是一個令人驚訝的慣例:這是整數型別提升不會產生整數的唯一情況。目前,我們將保持 uint64 提升未定義,稍後再返回討論。
混合提升:整數和浮點數#
當將整數提升為浮點數時,我們可能會從與帶號和無號整數之間混合提升相同的思考過程開始。16 位元帶號或無號整數無法由 16 位元浮點數以全精度表示,後者只有 10 位元尾數。因此,將整數提升為以兩倍位元數表示的浮點數可能更有意義
顯示程式碼儲存格來源
#@title
import networkx as nx
import matplotlib.pyplot as plt
lattice = {
  'i*': ['f*', 'u8', 'i8'], 'f*': ['c*', 'f16'], 'c*': ['c64'],
  'u8': ['u16', 'i16', 'f16'], 'u16': ['u32', 'i32', 'f32'], 'u32': ['u64', 'i64', 'f64'],
  'i8': ['i16', 'f16'], 'i16': ['i32', 'f32'], 'i32': ['i64', 'f64'],
  'f16': ['f32'], 'f32': ['f64', 'c64'], 'f64': ['c128'],
  'c64': ['c128']
}
graph = nx.from_dict_of_lists(lattice, create_using=nx.DiGraph)
pos = {
  'i*': [-1.25, 0.5], 'f*': [-0.5, 2], 'c*': [0, 3],
  'u8': [0.5, 0], 'u16': [1.5, 0], 'u32': [2.5, 0], 'u64': [3.5, 0],
  'i8': [0, 1], 'i16': [1, 1], 'i32': [2, 1], 'i64': [3, 1],
  'f16': [0.5, 2], 'f32': [1.5, 2], 'f64': [2.5, 2],
  'c64': [2, 3], 'c128': [3, 3],
}
fig, ax = plt.subplots(figsize=(6, 5))
nx.draw(graph, with_labels=True, node_size=1500, node_color='lightgray', pos=pos, ax=ax)
這實際上就是 Numpy 型別提升的作用,但這樣做會破壞圖的格狀性質:例如,{i8, u8} 這對不再有唯一的最小上界:可能性是 i16 和 f16,它們在圖上是無法排序的。這結果證明是 NumPy 上述非結合型別提升的根源。
我們能否提出 NumPy 提升規則的修改方案,使其滿足格狀性質,同時也為混合型別提升提供合理的結果?我們可以考慮幾種方法。
選項 0:將整數/浮點數混合精度保持未定義狀態#
為了使行為完全可預測(但會犧牲使用者便利性),一個站得住腳的選擇是將任何超出 Python 純量的整數/浮點數混合提升保持未定義狀態,並停留在前一節的部分格狀結構。缺點是使用者在整數和浮點數量之間操作時,需要明確地進行型別轉換。
選項 1:避免所有精度損失#
如果我們的重點是完全避免精度損失,我們可以透過其現有的有號整數路徑將無號整數提升為浮點數,從而恢復格狀性質
顯示程式碼儲存格來源
#@title
import networkx as nx
import matplotlib.pyplot as plt
lattice = {
  'i*': ['f*', 'u8', 'i8'], 'f*': ['c*', 'f16'], 'c*': ['c64'],
  'u8': ['u16', 'i16'], 'u16': ['u32', 'i32'], 'u32': ['u64', 'i64'],
  'i8': ['i16', 'f16'], 'i16': ['i32', 'f32'], 'i32': ['i64', 'f64'],
  'f16': ['f32'], 'f32': ['f64', 'c64'], 'f64': ['c128'],
  'c64': ['c128']
}
graph = nx.from_dict_of_lists(lattice, create_using=nx.DiGraph)
pos = {
  'i*': [-1.25, 0.5], 'f*': [-0.5, 2], 'c*': [0, 3],
  'u8': [0.5, 0], 'u16': [1.5, 0], 'u32': [2.5, 0], 'u64': [3.5, 0],
  'i8': [0, 1], 'i16': [1, 1], 'i32': [2, 1], 'i64': [3, 1],
  'f16': [0.5, 2], 'f32': [1.5, 2], 'f64': [2.5, 2],
  'c64': [2, 3], 'c128': [3, 3],
}
fig, ax = plt.subplots(figsize=(6, 5))
nx.draw(graph, with_labels=True, node_size=1500, node_color='lightgray', pos=pos, ax=ax)
這種方法的一個缺點是,它仍然使 int64 和 uint64 的提升保持未定義狀態,因為沒有標準的浮點數型別具有足夠的尾數位來表示它們完整的數值範圍。我們可以放寬精度限制,並透過從 i64->f64 和 u64->f64 繪製連接來完成格狀結構,但這些連結將與此提升方案的動機背道而馳。
第二個缺點是,這個格狀結構使其難以找到一個合適的位置來插入 bfloat16(見下文),同時保持格狀性質。
這種方法的第三個缺點,對於 JAX 的加速器後端來說更為重要,是一些操作會產生比必要寬度更大的型別;例如,uint16 和 float16 之間的混合操作會一路提升到 float64,這並不理想。
選項 2:避免大多數寬度超出必要的提升#
為了處理不必要的提升到更寬型別的問題,我們可以接受在整數/浮點數提升中存在一些精度損失的可能性,將有號整數提升到相同寬度的浮點數
顯示程式碼儲存格來源
#@title
import networkx as nx
import matplotlib.pyplot as plt
lattice = {
  'i*': ['f*', 'u8', 'i8'], 'f*': ['c*', 'f16'], 'c*': ['c64'],
  'u8': ['u16', 'i16'], 'u16': ['u32', 'i32'], 'u32': ['u64', 'i64'],
  'i8': ['i16'], 'i16': ['f16', 'i32'], 'i32': ['f32', 'i64'], 'i64': ['f64'],
  'f16': ['f32'], 'f32': ['f64', 'c64'], 'f64': ['c128'],
  'c64': ['c128']
}
graph = nx.from_dict_of_lists(lattice, create_using=nx.DiGraph)
pos = {
  'i*': [-1.25, 0.5], 'f*': [-0.5, 2], 'c*': [0, 3],
  'u8': [0.5, 0], 'u16': [1.5, 0], 'u32': [2.5, 0], 'u64': [3.5, 0],
  'i8': [0, 1], 'i16': [1, 1], 'i32': [2, 1], 'i64': [3, 1],
  'f16': [1.5, 2], 'f32': [2.5, 2], 'f64': [3.5, 2],
  'c64': [3, 3], 'c128': [4, 3],
}
fig, ax = plt.subplots(figsize=(6, 5))
nx.draw(graph, with_labels=True, node_size=1500, node_color='lightgray', pos=pos, ax=ax)
雖然這確實允許整數和浮點數之間發生精度損失的提升,但這些提升不會錯誤地表示結果的量級:儘管浮點數尾數不夠寬以表示所有值,但指數足夠寬以近似它們。
這種方法還允許從 int64 到 float64 的自然提升路徑,儘管 uint64 在此方案中仍然無法提升。話雖如此,從 u64 到 f64 的連接在這裡比以前更容易被證明是合理的。
這種提升方案仍然會導致一些寬度超出必要的提升路徑;例如,float32 和 uint32 之間的操作會產生 float64。此外,這個格狀結構使其難以找到一個合適的位置來插入 bfloat16(見下文),同時保持格狀性質。
選項 3:避免所有寬度超出必要的提升#
如果我們願意從根本上改變我們對整數和浮點數提升的思考方式,我們可以避免所有非理想的 64 位元提升。正如純量總是服從陣列型別的寬度一樣,我們可以讓整數總是服從浮點數型別的寬度
顯示程式碼儲存格來源
#@title
import networkx as nx
import matplotlib.pyplot as plt
lattice = {
  'i*': ['u8', 'i8'], 'f*': ['c*', 'f16'], 'c*': ['c64'],
  'u8': ['u16', 'i16'], 'u16': ['u32', 'i32'], 'u32': ['u64', 'i64'],
  'i8': ['i16'], 'i16': ['i32'], 'i32': ['i64'], 'i64': ['f*'],
  'f16': ['f32'], 'f32': ['f64', 'c64'], 'f64': ['c128'],
  'c64': ['c128']
}
graph = nx.from_dict_of_lists(lattice, create_using=nx.DiGraph)
pos = {
  'i*': [-1.25, 0.5], 'f*': [-0.5, 2], 'c*': [0, 3],
  'u8': [0.5, 0], 'u16': [1.5, 0], 'u32': [2.5, 0], 'u64': [3.5, 0],
  'i8': [0, 1], 'i16': [1, 1], 'i32': [2, 1], 'i64': [3, 1],
  'f16': [1.5, 2], 'f32': [2.5, 2], 'f64': [3.5, 2],
  'c64': [3, 3], 'c128': [4, 3],
}
fig, ax = plt.subplots(figsize=(6, 5))
nx.draw(graph, with_labels=True, node_size=1500, node_color='lightgray', pos=pos, ax=ax)
這涉及一點障眼法:之前我們使用 f* 來指代純量型別。在這個格狀結構中,f* 可能適用於混合計算的陣列輸出。與其將 f* 視為純量,不如將其視為一種特殊的 float 值,具有不同的提升規則:在 JAX 中,我們將其稱為弱浮點數;見下文。
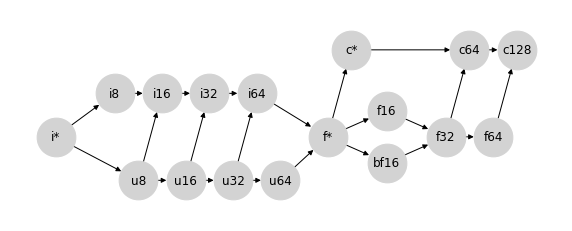
這種方法的優點是,除了無號整數之外,它避免了所有寬度超出必要的提升:你永遠不會在沒有 64 位元輸入的情況下獲得 f64 輸出,也永遠不會在沒有 32 位元輸入的情況下獲得 f32 輸出:這為在加速器上工作提供了方便的語義,同時避免了意外的 64 位元值。
這種賦予浮點數型別優先權的特性類似於 PyTorch 的型別提升行為。這個格狀結構也恰好生成了一個提升表,該表非常接近 JAX 最初的 ad hoc 型別提升方案,該方案不是基於格狀結構,但具有賦予浮點數型別優先權的特性。
這個格狀結構還提供了一個自然的位置來插入 bfloat16,而無需在 bf16 和 f16 之間強加排序
顯示程式碼儲存格來源
#@title
import networkx as nx
import matplotlib.pyplot as plt
lattice = {
  'i*': ['u8', 'i8'], 'f*': ['c*', 'f16', 'bf16'], 'c*': ['c64'],
  'u8': ['u16', 'i16'], 'u16': ['u32', 'i32'], 'u32': ['u64', 'i64'],
  'i8': ['i16'], 'i16': ['i32'], 'i32': ['i64'], 'i64': ['f*'],
  'f16': ['f32'], 'bf16': ['f32'], 'f32': ['f64', 'c64'], 'f64': ['c128'],
  'c64': ['c128']
}
graph = nx.from_dict_of_lists(lattice, create_using=nx.DiGraph)
pos = {
  'i*': [-1.25, 0.5], 'f*': [-0.5, 2], 'c*': [0, 3],
  'u8': [0.5, 0], 'u16': [1.5, 0], 'u32': [2.5, 0], 'u64': [3.5, 0],
  'i8': [0, 1], 'i16': [1, 1], 'i32': [2, 1], 'i64': [3, 1],
  'f16': [1.8, 1.7], 'bf16': [1.8, 2.3], 'f32': [3.0, 2], 'f64': [4.0, 2],
  'c64': [3.5, 3], 'c128': [4.5, 3],
}
fig, ax = plt.subplots(figsize=(6, 5))
nx.draw(graph, with_labels=True, node_size=1500, node_color='lightgray', pos=pos, ax=ax)

這很重要,因為 f16 和 bf16 是不可比較的,因為它們以不同的方式利用其位元:bf16 以較低的精度表示較大的範圍,而 f16 以較高的精度表示較小的範圍。
然而,這些優點也帶來了一些權衡
混合浮點數/整數提升非常容易造成精度損失:例如,
int64(最大值為 \(9.2 \times 10^{18}\))可以提升為float16(最大值為 \(6.5 \times 10^4\)),這意味著大多數可表示的值將變成inf。如上所述,
f*不再能被視為「純量型別」,而是作為 float64 的一種不同風味。在 JAX 的術語中,這被稱為弱型別,因為它以 64 位元表示,但在與其他值進行提升時,僅弱地保持此位元寬度。
請注意,此外,這種方法仍然讓 uint64 提升問題懸而未決,儘管透過將 u64 連接到 f* 來封閉格狀結構可能是合理的。
JAX 中的型別提升#
在設計 JAX 的型別提升語義時,我們牢記了許多這些想法,並在很大程度上傾向於以下幾點
我們選擇將 JAX 的型別提升語義限制在滿足格狀性質的圖上:這是為了確保結合性和交換性,同時也允許以 DAG(有向無環圖)緊湊地描述語義,而不是需要一個大型表格。
我們傾向於避免意外提升到更寬型別的語義,尤其是在涉及到浮點數值時,以便有利於在加速器上進行計算。
如果需要維持 (1) 和 (2),我們可以接受混合型別提升中潛在的精度損失(但不是量級損失)
考慮到這一點,JAX 採用了選項 3。或者更確切地說,是選項 3 的稍微修改版本,它在 u64 和 f* 之間建立連接,以便創建一個真正的格狀結構。為了清晰起見,重新排列節點後,JAX 的型別提升格狀結構如下所示
顯示程式碼儲存格來源
#@title
import networkx as nx
import matplotlib.pyplot as plt
lattice = {
  'i*': ['u8', 'i8'], 'f*': ['c*', 'f16', 'bf16'], 'c*': ['c64'],
  'u8': ['u16', 'i16'], 'u16': ['u32', 'i32'], 'u32': ['u64', 'i64'], 'u64': ['f*'],
  'i8': ['i16'], 'i16': ['i32'], 'i32': ['i64'], 'i64': ['f*'],
  'f16': ['f32'], 'bf16': ['f32'], 'f32': ['f64', 'c64'], 'f64': ['c128'],
  'c64': ['c128']
}
graph = nx.from_dict_of_lists(lattice, create_using=nx.DiGraph)
pos = {
  'i*': [-1.25, 0.5], 'f*': [4.5, 0.5], 'c*': [5, 1.5],
  'u8': [0.5, 0], 'u16': [1.5, 0], 'u32': [2.5, 0], 'u64': [3.5, 0],
  'i8': [0, 1], 'i16': [1, 1], 'i32': [2, 1], 'i64': [3, 1],
  'f16': [5.75, 0.8], 'bf16': [5.75, 0.2], 'f32': [7, 0.5], 'f64': [8, 0.5],
  'c64': [7.5, 1.5], 'c128': [8.5, 1.5],
}
fig, ax = plt.subplots(figsize=(10, 4))
ax.set_ylim(-0.5, 2)
nx.draw(graph, with_labels=True, node_size=1500, node_color='lightgray', pos=pos, ax=ax)
# ax.patches[12].set_linestyle((0, (2, 4)))
這種選擇產生的行為總結在JAX 型別提升語義中。值得注意的是,除了包含更大的無號型別(u16、u32、u64)以及關於純量/弱型別(i*、f*、c*)行為的一些細節之外,這種型別提升方案結果與 PyTorch 選擇的方案非常接近。
對於那些感興趣的人,下面的附錄列印了 NumPy、Tensorflow、PyTorch 和 JAX 使用的完整提升表。
附錄:型別提升表範例#
以下是各種 Python 陣列計算函式庫實作的隱式型別提升表的一些範例。
NumPy 型別提升#
請注意,NumPy 不包含 bfloat16 dtype,並且下表忽略了依賴數值的效應。
顯示程式碼儲存格來源
# @title

import numpy as np
import pandas as pd
from IPython import display

np_dtypes = {
  'b': np.bool_,
  'u8': np.uint8, 'u16': np.uint16, 'u32': np.uint32, 'u64': np.uint64,
  'i8': np.int8, 'i16': np.int16, 'i32': np.int32, 'i64': np.int64,
  'bf16': 'invalid', 'f16': np.float16, 'f32': np.float32, 'f64': np.float64,
  'c64': np.complex64, 'c128': np.complex128,
  'i*': int, 'f*': float, 'c*': complex}

np_dtype_to_code = {val: key for key, val in np_dtypes.items()}

def make_np_zero(dtype):
  if dtype in {int, float, complex}:
    return dtype(0)
  else:
    return np.zeros(1, dtype=dtype)

def np_result_code(dtype1, dtype2):
  try:
    out = np.add(make_np_zero(dtype1), make_np_zero(dtype2))
  except TypeError:
    return '-'
  else:
    if type(out) in {int, float, complex}:
      return np_dtype_to_code[type(out)]
    else:
      return np_dtype_to_code[out.dtype.type]


grid = [[np_result_code(dtype1, dtype2)
         for dtype2 in np_dtypes.values()]
        for dtype1 in np_dtypes.values()]
table = pd.DataFrame(grid, index=np_dtypes.keys(), columns=np_dtypes.keys())
display.HTML(table.to_html())
| b | u8 | u16 | u32 | u64 | i8 | i16 | i32 | i64 | bf16 | f16 | f32 | f64 | c64 | c128 | i* | f* | c* | |
|---|---|---|---|---|---|---|---|---|---|---|---|---|---|---|---|---|---|---|
| b | b | u8 | u16 | u32 | u64 | i8 | i16 | i32 | i64 | - | f16 | f32 | f64 | c64 | c128 | i64 | f64 | c128 |
| u8 | u8 | u8 | u16 | u32 | u64 | i16 | i16 | i32 | i64 | - | f16 | f32 | f64 | c64 | c128 | u8 | f64 | c128 |
| u16 | u16 | u16 | u16 | u32 | u64 | i32 | i32 | i32 | i64 | - | f32 | f32 | f64 | c64 | c128 | u16 | f64 | c128 |
| u32 | u32 | u32 | u32 | u32 | u64 | i64 | i64 | i64 | i64 | - | f64 | f64 | f64 | c128 | c128 | u32 | f64 | c128 |
| u64 | u64 | u64 | u64 | u64 | u64 | f64 | f64 | f64 | f64 | - | f64 | f64 | f64 | c128 | c128 | u64 | f64 | c128 |
| i8 | i8 | i16 | i32 | i64 | f64 | i8 | i16 | i32 | i64 | - | f16 | f32 | f64 | c64 | c128 | i8 | f64 | c128 |
| i16 | i16 | i16 | i32 | i64 | f64 | i16 | i16 | i32 | i64 | - | f32 | f32 | f64 | c64 | c128 | i16 | f64 | c128 |
| i32 | i32 | i32 | i32 | i64 | f64 | i32 | i32 | i32 | i64 | - | f64 | f64 | f64 | c128 | c128 | i32 | f64 | c128 |
| i64 | i64 | i64 | i64 | i64 | f64 | i64 | i64 | i64 | i64 | - | f64 | f64 | f64 | c128 | c128 | i64 | f64 | c128 |
| bf16 | - | - | - | - | - | - | - | - | - | - | - | - | - | - | - | - | - | - |
| f16 | f16 | f16 | f32 | f64 | f64 | f16 | f32 | f64 | f64 | - | f16 | f32 | f64 | c64 | c128 | f16 | f16 | c64 |
| f32 | f32 | f32 | f32 | f64 | f64 | f32 | f32 | f64 | f64 | - | f32 | f32 | f64 | c64 | c128 | f32 | f32 | c64 |
| f64 | f64 | f64 | f64 | f64 | f64 | f64 | f64 | f64 | f64 | - | f64 | f64 | f64 | c128 | c128 | f64 | f64 | c128 |
| c64 | c64 | c64 | c64 | c128 | c128 | c64 | c64 | c128 | c128 | - | c64 | c64 | c128 | c64 | c128 | c64 | c64 | c64 |
| c128 | c128 | c128 | c128 | c128 | c128 | c128 | c128 | c128 | c128 | - | c128 | c128 | c128 | c128 | c128 | c128 | c128 | c128 |
| i* | i64 | u8 | u16 | u32 | u64 | i8 | i16 | i32 | i64 | - | f16 | f32 | f64 | c64 | c128 | i64 | f64 | c128 |
| f* | f64 | f64 | f64 | f64 | f64 | f64 | f64 | f64 | f64 | - | f16 | f32 | f64 | c64 | c128 | f64 | f64 | c128 |
| c* | c128 | c128 | c128 | c128 | c128 | c128 | c128 | c128 | c128 | - | c64 | c64 | c128 | c64 | c128 | c128 | c128 | c128 |
Tensorflow 型別提升#
Tensorflow 避免定義隱式型別提升,除了在有限情況下使用 Python 純量。該表是非對稱的,因為在 tf.add(x, y) 中,y 的型別必須可強制轉換為 x 的型別。
顯示程式碼儲存格來源
# @title

import tensorflow as tf
import pandas as pd
from IPython import display

tf_dtypes = {
  'b': tf.bool,
  'u8': tf.uint8, 'u16': tf.uint16, 'u32': tf.uint32, 'u64': tf.uint64,
  'i8': tf.int8, 'i16': tf.int16, 'i32': tf.int32, 'i64': tf.int64,
  'bf16': tf.bfloat16, 'f16': tf.float16, 'f32': tf.float32, 'f64': tf.float64,
  'c64': tf.complex64, 'c128': tf.complex128,
  'i*': int, 'f*': float, 'c*': complex}

tf_dtype_to_code = {val: key for key, val in tf_dtypes.items()}

def make_tf_zero(dtype):
  if dtype in {int, float, complex}:
    return dtype(0)
  else:
    return tf.zeros(1, dtype=dtype)

def result_code(dtype1, dtype2):
  try:
    out = tf.add(make_tf_zero(dtype1), make_tf_zero(dtype2))
  except (TypeError, tf.errors.InvalidArgumentError):
    return '-'
  else:
    if type(out) in {int, float, complex}:
      return tf_dtype_to_code[type(out)]
    else:
      return tf_dtype_to_code[out.dtype]


grid = [[result_code(dtype1, dtype2)
         for dtype2 in tf_dtypes.values()]
        for dtype1 in tf_dtypes.values()]
table = pd.DataFrame(grid, index=tf_dtypes.keys(), columns=tf_dtypes.keys())
display.HTML(table.to_html())
| b | u8 | u16 | u32 | u64 | i8 | i16 | i32 | i64 | bf16 | f16 | f32 | f64 | c64 | c128 | i* | f* | c* | |
|---|---|---|---|---|---|---|---|---|---|---|---|---|---|---|---|---|---|---|
| b | - | - | - | - | - | - | - | - | - | - | - | - | - | - | - | - | - | - |
| u8 | - | u8 | - | - | - | - | - | - | - | - | - | - | - | - | - | u8 | - | - |
| u16 | - | - | u16 | - | - | - | - | - | - | - | - | - | - | - | - | u16 | - | - |
| u32 | - | - | - | u32 | - | - | - | - | - | - | - | - | - | - | - | u32 | - | - |
| u64 | - | - | - | - | u64 | - | - | - | - | - | - | - | - | - | - | u64 | - | - |
| i8 | - | - | - | - | - | i8 | - | - | - | - | - | - | - | - | - | i8 | - | - |
| i16 | - | - | - | - | - | - | i16 | - | - | - | - | - | - | - | - | i16 | - | - |
| i32 | - | - | - | - | - | - | - | i32 | - | - | - | - | - | - | - | i32 | - | - |
| i64 | - | - | - | - | - | - | - | - | i64 | - | - | - | - | - | - | i64 | - | - |
| bf16 | - | - | - | - | - | - | - | - | - | bf16 | - | - | - | - | - | bf16 | bf16 | - |
| f16 | - | - | - | - | - | - | - | - | - | - | f16 | - | - | - | - | f16 | f16 | - |
| f32 | - | - | - | - | - | - | - | - | - | - | - | f32 | - | - | - | f32 | f32 | - |
| f64 | - | - | - | - | - | - | - | - | - | - | - | - | f64 | - | - | f64 | f64 | - |
| c64 | - | - | - | - | - | - | - | - | - | - | - | - | - | c64 | - | c64 | c64 | c64 |
| c128 | - | - | - | - | - | - | - | - | - | - | - | - | - | - | c128 | c128 | c128 | c128 |
| i* | - | - | - | - | - | - | - | i32 | - | - | - | - | - | - | - | i32 | - | - |
| f* | - | - | - | - | - | - | - | - | - | - | - | f32 | - | - | - | f32 | f32 | - |
| c* | - | - | - | - | - | - | - | - | - | - | - | - | - | - | c128 | c128 | c128 | c128 |
PyTorch 型別提升#
請注意,torch 不包含大於 uint8 的無號整數型別。除了這一點以及關於純量/弱型別提升的一些細節之外,該表與 jax.numpy 使用的表非常接近。
顯示程式碼儲存格來源
# @title
import torch
import pandas as pd
from IPython import display

torch_dtypes = {
  'b': torch.bool,
  'u8': torch.uint8, 'u16': 'invalid', 'u32': 'invalid', 'u64': 'invalid',
  'i8': torch.int8, 'i16': torch.int16, 'i32': torch.int32, 'i64': torch.int64,
  'bf16': torch.bfloat16, 'f16': torch.float16, 'f32': torch.float32, 'f64': torch.float64,
  'c64': torch.complex64, 'c128': torch.complex128,
  'i*': int, 'f*': float, 'c*': complex}

torch_dtype_to_code = {val: key for key, val in torch_dtypes.items()}

def make_torch_zero(dtype):
  if dtype in {int, float, complex}:
    return dtype(0)
  else:
    return torch.zeros(1, dtype=dtype)

def torch_result_code(dtype1, dtype2):
  try:
    out = torch.add(make_torch_zero(dtype1), make_torch_zero(dtype2))
  except TypeError:
    return '-'
  else:
    if type(out) in {int, float, complex}:
      return torch_dtype_to_code[type(out)]
    else:
      return torch_dtype_to_code[out.dtype]


grid = [[torch_result_code(dtype1, dtype2)
         for dtype2 in torch_dtypes.values()]
        for dtype1 in torch_dtypes.values()]
table = pd.DataFrame(grid, index=torch_dtypes.keys(), columns=torch_dtypes.keys())
display.HTML(table.to_html())
| b | u8 | u16 | u32 | u64 | i8 | i16 | i32 | i64 | bf16 | f16 | f32 | f64 | c64 | c128 | i* | f* | c* | |
|---|---|---|---|---|---|---|---|---|---|---|---|---|---|---|---|---|---|---|
| b | b | u8 | - | - | - | i8 | i16 | i32 | i64 | bf16 | f16 | f32 | f64 | c64 | c128 | i64 | f32 | c64 |
| u8 | u8 | u8 | - | - | - | i16 | i16 | i32 | i64 | bf16 | f16 | f32 | f64 | c64 | c128 | u8 | f32 | c64 |
| u16 | - | - | - | - | - | - | - | - | - | - | - | - | - | - | - | - | - | - |
| u32 | - | - | - | - | - | - | - | - | - | - | - | - | - | - | - | - | - | - |
| u64 | - | - | - | - | - | - | - | - | - | - | - | - | - | - | - | - | - | - |
| i8 | i8 | i16 | - | - | - | i8 | i16 | i32 | i64 | bf16 | f16 | f32 | f64 | c64 | c128 | i8 | f32 | c64 |
| i16 | i16 | i16 | - | - | - | i16 | i16 | i32 | i64 | bf16 | f16 | f32 | f64 | c64 | c128 | i16 | f32 | c64 |
| i32 | i32 | i32 | - | - | - | i32 | i32 | i32 | i64 | bf16 | f16 | f32 | f64 | c64 | c128 | i32 | f32 | c64 |
| i64 | i64 | i64 | - | - | - | i64 | i64 | i64 | i64 | bf16 | f16 | f32 | f64 | c64 | c128 | i64 | f32 | c64 |
| bf16 | bf16 | bf16 | - | - | - | bf16 | bf16 | bf16 | bf16 | bf16 | f32 | f32 | f64 | c64 | c128 | bf16 | bf16 | c64 |
| f16 | f16 | f16 | - | - | - | f16 | f16 | f16 | f16 | f32 | f16 | f32 | f64 | c64 | c128 | f16 | f16 | c64 |
| f32 | f32 | f32 | - | - | - | f32 | f32 | f32 | f32 | f32 | f32 | f32 | f64 | c64 | c128 | f32 | f32 | c64 |
| f64 | f64 | f64 | - | - | - | f64 | f64 | f64 | f64 | f64 | f64 | f64 | f64 | c128 | c128 | f64 | f64 | c128 |
| c64 | c64 | c64 | - | - | - | c64 | c64 | c64 | c64 | c64 | c64 | c64 | c128 | c64 | c128 | c64 | c64 | c64 |
| c128 | c128 | c128 | - | - | - | c128 | c128 | c128 | c128 | c128 | c128 | c128 | c128 | c128 | c128 | c128 | c128 | c128 |
| i* | i64 | u8 | - | - | - | i8 | i16 | i32 | i64 | bf16 | f16 | f32 | f64 | c64 | c128 | i64 | f32 | c64 |
| f* | f32 | f32 | - | - | - | f32 | f32 | f32 | f32 | bf16 | f16 | f32 | f64 | c64 | c128 | f32 | f64 | c64 |
| c* | c64 | c64 | - | - | - | c64 | c64 | c64 | c64 | c64 | c64 | c64 | c128 | c64 | c128 | c64 | c64 | c128 |
JAX 型別提升:jax.numpy#
jax.numpy 遵循 https://jax.dev.org.tw/en/latest/type_promotion.html 上列出的型別提升規則。在這裡,我們使用 i*、f*、c* 來表示 Python 純量和弱型別陣列。
顯示程式碼儲存格來源
# @title
import jax
import jax.numpy as jnp
import pandas as pd
from IPython import display
jax.config.update('jax_enable_x64', True)

jnp_dtypes = {
  'b': jnp.bool_.dtype,
  'u8': jnp.uint8.dtype, 'u16': jnp.uint16.dtype, 'u32': jnp.uint32.dtype, 'u64': jnp.uint64.dtype,
  'i8': jnp.int8.dtype, 'i16': jnp.int16.dtype, 'i32': jnp.int32.dtype, 'i64': jnp.int64.dtype,
  'bf16': jnp.bfloat16.dtype, 'f16': jnp.float16.dtype, 'f32': jnp.float32.dtype, 'f64': jnp.float64.dtype,
  'c64': jnp.complex64.dtype, 'c128': jnp.complex128.dtype,
  'i*': int, 'f*': float, 'c*': complex}


jnp_dtype_to_code = {val: key for key, val in jnp_dtypes.items()}

def make_jnp_zero(dtype):
  if dtype in {int, float, complex}:
    return dtype(0)
  else:
    return jnp.zeros((), dtype=dtype)

def jnp_result_code(dtype1, dtype2):
  try:
    out = jnp.add(make_jnp_zero(dtype1), make_jnp_zero(dtype2))
  except TypeError:
    return '-'
  else:
    if hasattr(out, 'aval') and out.aval.weak_type:
      return out.dtype.kind + '*'
    elif type(out) in {int, float, complex}:
      return jnp_dtype_to_code[type(out)]
    else:
      return jnp_dtype_to_code[out.dtype]

grid = [[jnp_result_code(dtype1, dtype2)
         for dtype2 in jnp_dtypes.values()]
        for dtype1 in jnp_dtypes.values()]
table = pd.DataFrame(grid, index=jnp_dtypes.keys(), columns=jnp_dtypes.keys())
display.HTML(table.to_html())
| b | u8 | u16 | u32 | u64 | i8 | i16 | i32 | i64 | bf16 | f16 | f32 | f64 | c64 | c128 | i* | f* | c* | |
|---|---|---|---|---|---|---|---|---|---|---|---|---|---|---|---|---|---|---|
| b | b | u8 | u16 | u32 | u64 | i8 | i16 | i32 | i64 | bf16 | f16 | f32 | f64 | c64 | c128 | i* | f* | c* |
| u8 | u8 | u8 | u16 | u32 | u64 | i16 | i16 | i32 | i64 | bf16 | f16 | f32 | f64 | c64 | c128 | u8 | f* | c* |
| u16 | u16 | u16 | u16 | u32 | u64 | i32 | i32 | i32 | i64 | bf16 | f16 | f32 | f64 | c64 | c128 | u16 | f* | c* |
| u32 | u32 | u32 | u32 | u32 | u64 | i64 | i64 | i64 | i64 | bf16 | f16 | f32 | f64 | c64 | c128 | u32 | f* | c* |
| u64 | u64 | u64 | u64 | u64 | u64 | f* | f* | f* | f* | bf16 | f16 | f32 | f64 | c64 | c128 | u64 | f* | c* |
| i8 | i8 | i16 | i32 | i64 | f* | i8 | i16 | i32 | i64 | bf16 | f16 | f32 | f64 | c64 | c128 | i8 | f* | c* |
| i16 | i16 | i16 | i32 | i64 | f* | i16 | i16 | i32 | i64 | bf16 | f16 | f32 | f64 | c64 | c128 | i16 | f* | c* |
| i32 | i32 | i32 | i32 | i64 | f* | i32 | i32 | i32 | i64 | bf16 | f16 | f32 | f64 | c64 | c128 | i32 | f* | c* |
| i64 | i64 | i64 | i64 | i64 | f* | i64 | i64 | i64 | i64 | bf16 | f16 | f32 | f64 | c64 | c128 | i64 | f* | c* |
| bf16 | bf16 | bf16 | bf16 | bf16 | bf16 | bf16 | bf16 | bf16 | bf16 | bf16 | f32 | f32 | f64 | c64 | c128 | bf16 | bf16 | c64 |
| f16 | f16 | f16 | f16 | f16 | f16 | f16 | f16 | f16 | f16 | f32 | f16 | f32 | f64 | c64 | c128 | f16 | f16 | c64 |
| f32 | f32 | f32 | f32 | f32 | f32 | f32 | f32 | f32 | f32 | f32 | f32 | f32 | f64 | c64 | c128 | f32 | f32 | c64 |
| f64 | f64 | f64 | f64 | f64 | f64 | f64 | f64 | f64 | f64 | f64 | f64 | f64 | f64 | c128 | c128 | f64 | f64 | c128 |
| c64 | c64 | c64 | c64 | c64 | c64 | c64 | c64 | c64 | c64 | c64 | c64 | c64 | c128 | c64 | c128 | c64 | c64 | c64 |
| c128 | c128 | c128 | c128 | c128 | c128 | c128 | c128 | c128 | c128 | c128 | c128 | c128 | c128 | c128 | c128 | c128 | c128 | c128 |
| i* | i* | u8 | u16 | u32 | u64 | i8 | i16 | i32 | i64 | bf16 | f16 | f32 | f64 | c64 | c128 | i* | f* | c* |
| f* | f* | f* | f* | f* | f* | f* | f* | f* | f* | bf16 | f16 | f32 | f64 | c64 | c128 | f* | f* | c* |
| c* | c* | c* | c* | c* | c* | c* | c* | c* | c* | c64 | c64 | c64 | c128 | c64 | c128 | c* | c* | c* |
JAX 型別提升:jax.lax#
jax.lax 是更底層的,並且不進行任何隱式提升。在這裡,我們使用 i*、f*、c* 來表示 Python 純量和弱型別陣列。
顯示程式碼儲存格來源
# @title
import jax
import jax.numpy as jnp
import pandas as pd
from IPython import display
jax.config.update('jax_enable_x64', True)

jnp_dtypes = {
  'b': jnp.bool_.dtype,
  'u8': jnp.uint8.dtype, 'u16': jnp.uint16.dtype, 'u32': jnp.uint32.dtype, 'u64': jnp.uint64.dtype,
  'i8': jnp.int8.dtype, 'i16': jnp.int16.dtype, 'i32': jnp.int32.dtype, 'i64': jnp.int64.dtype,
  'bf16': jnp.bfloat16.dtype, 'f16': jnp.float16.dtype, 'f32': jnp.float32.dtype, 'f64': jnp.float64.dtype,
  'c64': jnp.complex64.dtype, 'c128': jnp.complex128.dtype,
  'i*': int, 'f*': float, 'c*': complex}


jnp_dtype_to_code = {val: key for key, val in jnp_dtypes.items()}

def make_jnp_zero(dtype):
  if dtype in {int, float, complex}:
    return dtype(0)
  else:
    return jnp.zeros((), dtype=dtype)

def jnp_result_code(dtype1, dtype2):
  try:
    out = jax.lax.add(make_jnp_zero(dtype1), make_jnp_zero(dtype2))
  except TypeError:
    return '-'
  else:
    if hasattr(out, 'aval') and out.aval.weak_type:
      return out.dtype.kind + '*'
    elif type(out) in {int, float, complex}:
      return jnp_dtype_to_code[type(out)]
    else:
      return jnp_dtype_to_code[out.dtype]

grid = [[jnp_result_code(dtype1, dtype2)
         for dtype2 in jnp_dtypes.values()]
        for dtype1 in jnp_dtypes.values()]
table = pd.DataFrame(grid, index=jnp_dtypes.keys(), columns=jnp_dtypes.keys())
display.HTML(table.to_html())
| b | u8 | u16 | u32 | u64 | i8 | i16 | i32 | i64 | bf16 | f16 | f32 | f64 | c64 | c128 | i* | f* | c* | |
|---|---|---|---|---|---|---|---|---|---|---|---|---|---|---|---|---|---|---|
| b | - | - | - | - | - | - | - | - | - | - | - | - | - | - | - | - | - | - |
| u8 | - | u8 | - | - | - | - | - | - | - | - | - | - | - | - | - | - | - | - |
| u16 | - | - | u16 | - | - | - | - | - | - | - | - | - | - | - | - | - | - | - |
| u32 | - | - | - | u32 | - | - | - | - | - | - | - | - | - | - | - | - | - | - |
| u64 | - | - | - | - | u64 | - | - | - | - | - | - | - | - | - | - | - | - | - |
| i8 | - | - | - | - | - | i8 | - | - | - | - | - | - | - | - | - | - | - | - |
| i16 | - | - | - | - | - | - | i16 | - | - | - | - | - | - | - | - | - | - | - |
| i32 | - | - | - | - | - | - | - | i32 | - | - | - | - | - | - | - | - | - | - |
| i64 | - | - | - | - | - | - | - | - | i64 | - | - | - | - | - | - | i64 | - | - |
| bf16 | - | - | - | - | - | - | - | - | - | bf16 | - | - | - | - | - | - | - | - |
| f16 | - | - | - | - | - | - | - | - | - | - | f16 | - | - | - | - | - | - | - |
| f32 | - | - | - | - | - | - | - | - | - | - | - | f32 | - | - | - | - | - | - |
| f64 | - | - | - | - | - | - | - | - | - | - | - | - | f64 | - | - | - | f64 | - |
| c64 | - | - | - | - | - | - | - | - | - | - | - | - | - | c64 | - | - | - | - |
| c128 | - | - | - | - | - | - | - | - | - | - | - | - | - | - | c128 | - | - | c128 |
| i* | - | - | - | - | - | - | - | - | i64 | - | - | - | - | - | - | i* | - | - |
| f* | - | - | - | - | - | - | - | - | - | - | - | - | f64 | - | - | - | f* | - |
| c* | - | - | - | - | - | - | - | - | - | - | - | - | - | - | c128 | - | - | c* |